You need to order custom lanyards for an event. It seems easy, but a vague brief leads to ugly samples, delays, and frustration. How do you get it right the first time?
To order custom lanyards, you must define five key specifications: the lanyard material and width, the logo printing method, the clip and attachment hardware, and whether you need a safety breakaway. Providing these details ensures you get an accurate quote and a perfect product.
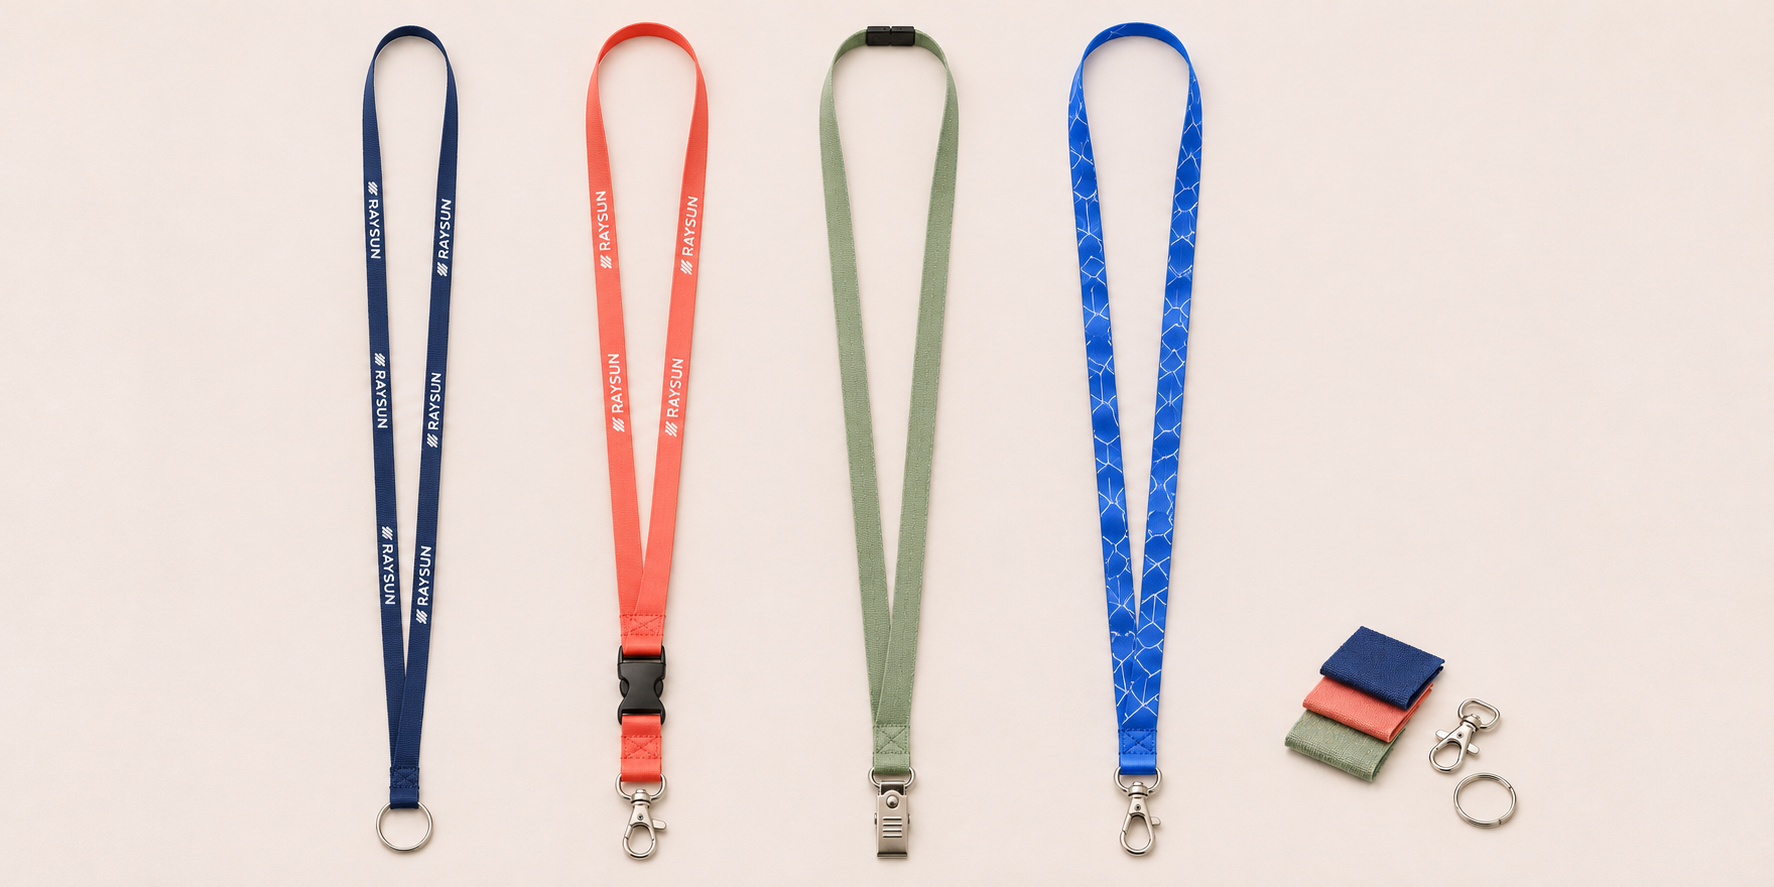
As a product design consultant, I have seen clients send emails saying, "I need 1,000 lanyards, give me a price." This approach is a recipe for disaster. It leads to endless back-and-forth emails, incorrect samples, and a final product that does not represent your brand well. Your job as a designer or brand manager is to be precise. A clear brief does not just get you a quote; it gets you the right product, faster. Let's break down these five key specifications into a simple checklist you can use every time.
How Do You Choose the Right Lanyard Material and Width?
You picked a material that looked cheap or started to fray after one day of use. Your brand looks bad, and attendees throw the lanyards away. How do you select a material that feels premium?
Choose polyester for most situations; it is durable, cost-effective, and holds color well. For a more premium, shinier look, select nylon. Use a standard width of 3/4" (20mm) as it offers the best balance of comfort and space for your logo.
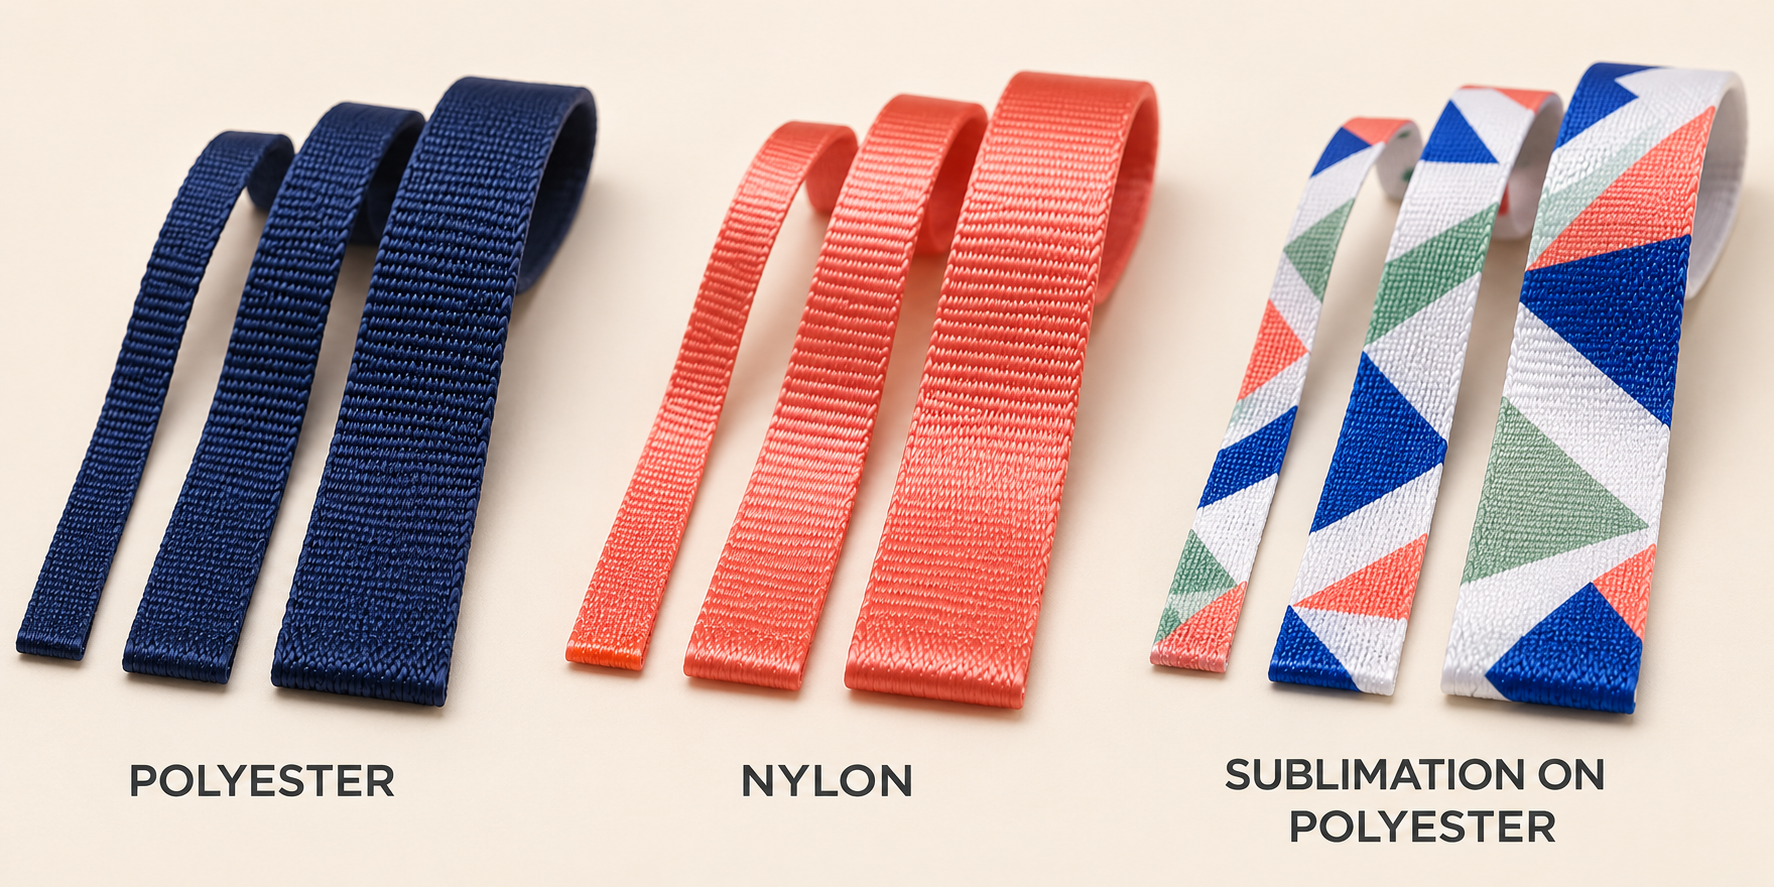
The material and width are the foundation of your lanyard. They determine how it feels around the neck and how it represents your brand's quality. A flimsy, thin lanyard feels cheap. A well-made one feels like a professional piece of gear. When I work with clients, I always start here because it dictates the entire user experience. Don't just default to the cheapest option; think about what feel you want to achieve. For most corporate events, conferences, and trade shows, a flat polyester lanyard is the industry workhorse. It provides the best combination of durability and value.
Comparing Common Lanyard Materials
The material you choose impacts the look, feel, and printing possibilities. Here is a quick breakdown to help you decide.
| Material | Best For | Feel & Appearance |
|---|---|---|
| Polyester | All-purpose, budget-conscious | Durable, slightly ribbed texture, matte finish. |
| Nylon | Premium branding, simple logos | Smooth, silky, slight sheen. Feels high-end. |
| Dye Sublimation | Full-color, complex graphics | Ultra-smooth, satin-like. Graphics are part of the fabric. |
| Recycled PET | Eco-conscious brands | Similar to polyester, but made from plastic bottles. |
For width, 3/4" (or 20mm) is the gold standard. It is comfortable to wear all day and provides ample real estate for a clear, legible logo. Anything less than 5/8" can feel restrictive and makes your branding look cramped.
Which Printing Method Best Displays Your Logo?
Your complex logo looks blurry on the sample. The colors are wrong, and now production is delayed. How do you ensure your branding looks crisp, clean, and accurate every single time?
Use silkscreen printing for simple, one or two-color logos; it is durable and cost-effective. For intricate, multi-color, or photographic designs, you must choose dye sublimation. This method infuses the ink into the fabric for a sharp, seamless, full-color finish.
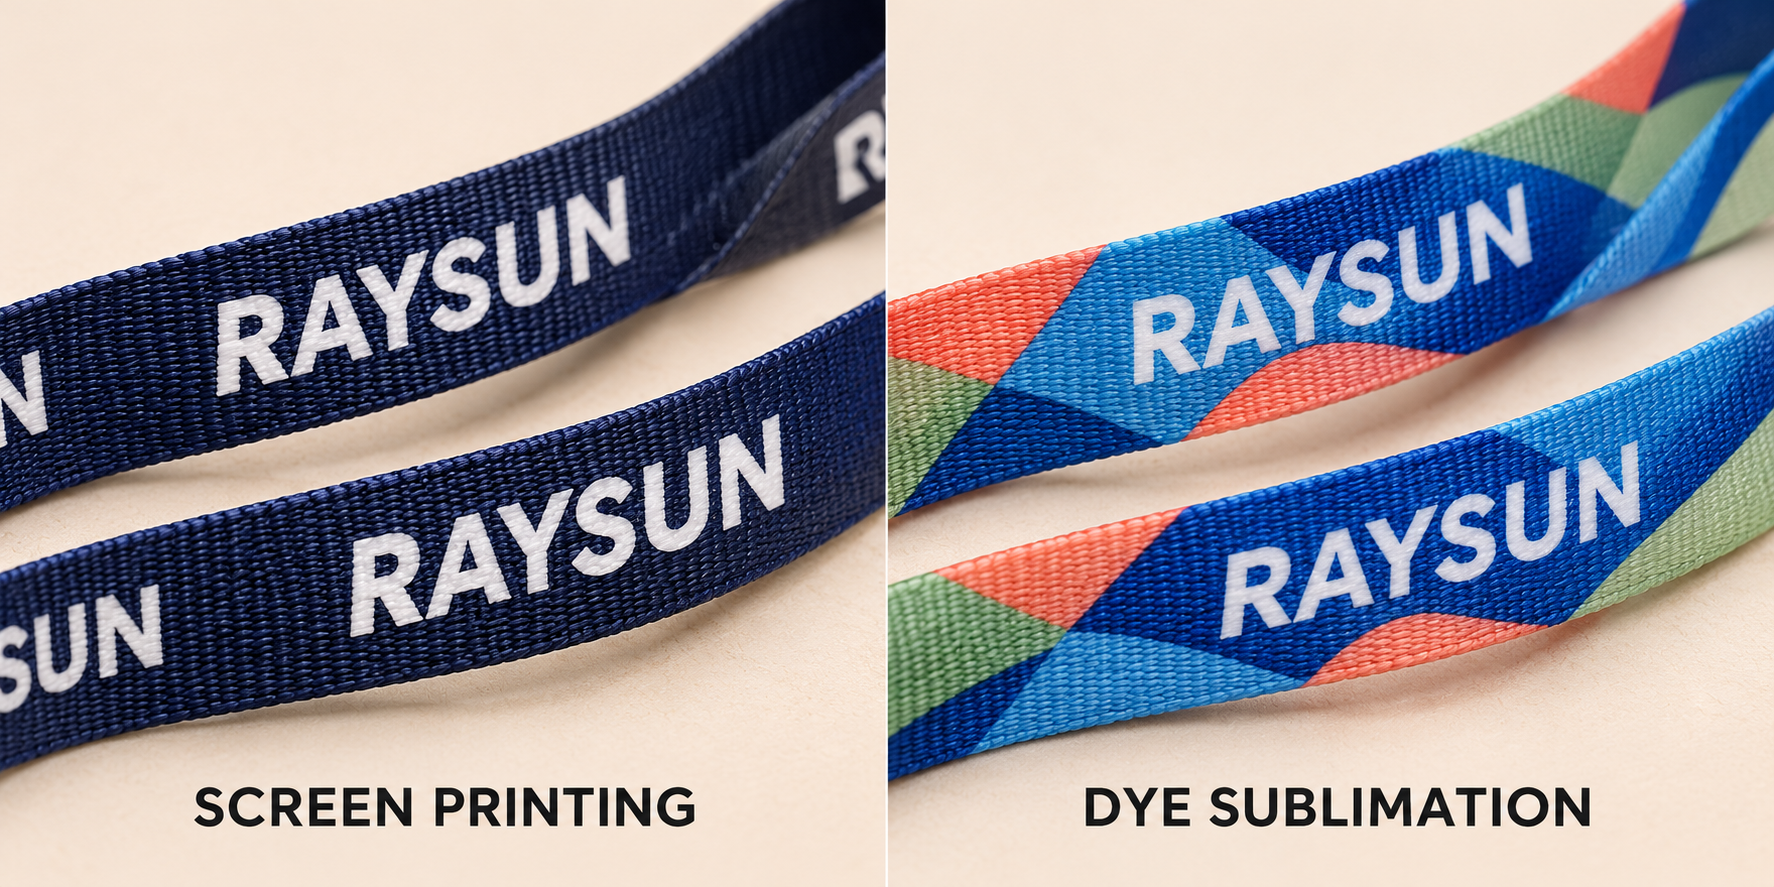
The printing method is the most critical decision for making your brand look good. Choosing the wrong one is the number one reason for sample rejection and production headaches. As a designer, you need to match the capabilities of the printing method to the complexity of your artwork. Sending a full-color gradient logo for a silkscreen job is like trying to fit a square peg in a round hole; it will never look right. You need to know the right tool for the job.
Matching Your Artwork to the Print Method
Think of it as two separate paths. One is for simple logos, and the other is for complex graphics.
Path 1: Silkscreen Printing
This is the classic method where ink is pushed through a screen onto the fabric. It is ideal for vector logos with solid spot colors.
- Best for: 1-3 color logos.
- Pros: Very durable, cost-effective for large quantities, vibrant spot colors.
- Cons: Not suitable for gradients or photographic images. Each color adds cost.
Path 2: Dye Sublimation
This process uses heat to transfer ink directly into the fabric, becoming a part of the material itself.
- Best for: Unlimited colors, gradients, photographic images, and edge-to-edge designs.
- Pros: Extremely sharp detail, no texture (ink is in the fabric), design will not crack or peel.
- Cons: Requires a polyester lanyard, slightly higher unit cost than a one-color silkscreen.
Before you even ask for a quote, decide which path your artwork requires. This will save you and your supplier a massive amount of time.
What Lanyard Hardware and Attachments Do You Need?
You ordered a standard clip, but it does not work with your slotted ID badges. Attendees are frustrated, and your event check-in is a mess. How do you choose the right hardware for the job?
The J-Hook is the most versatile and cost-effective option for most uses. For slotted ID cards or badge holders, the Bulldog Clip is ideal. Always ask for a sample or confirm the badge type before placing your final order to ensure compatibility.
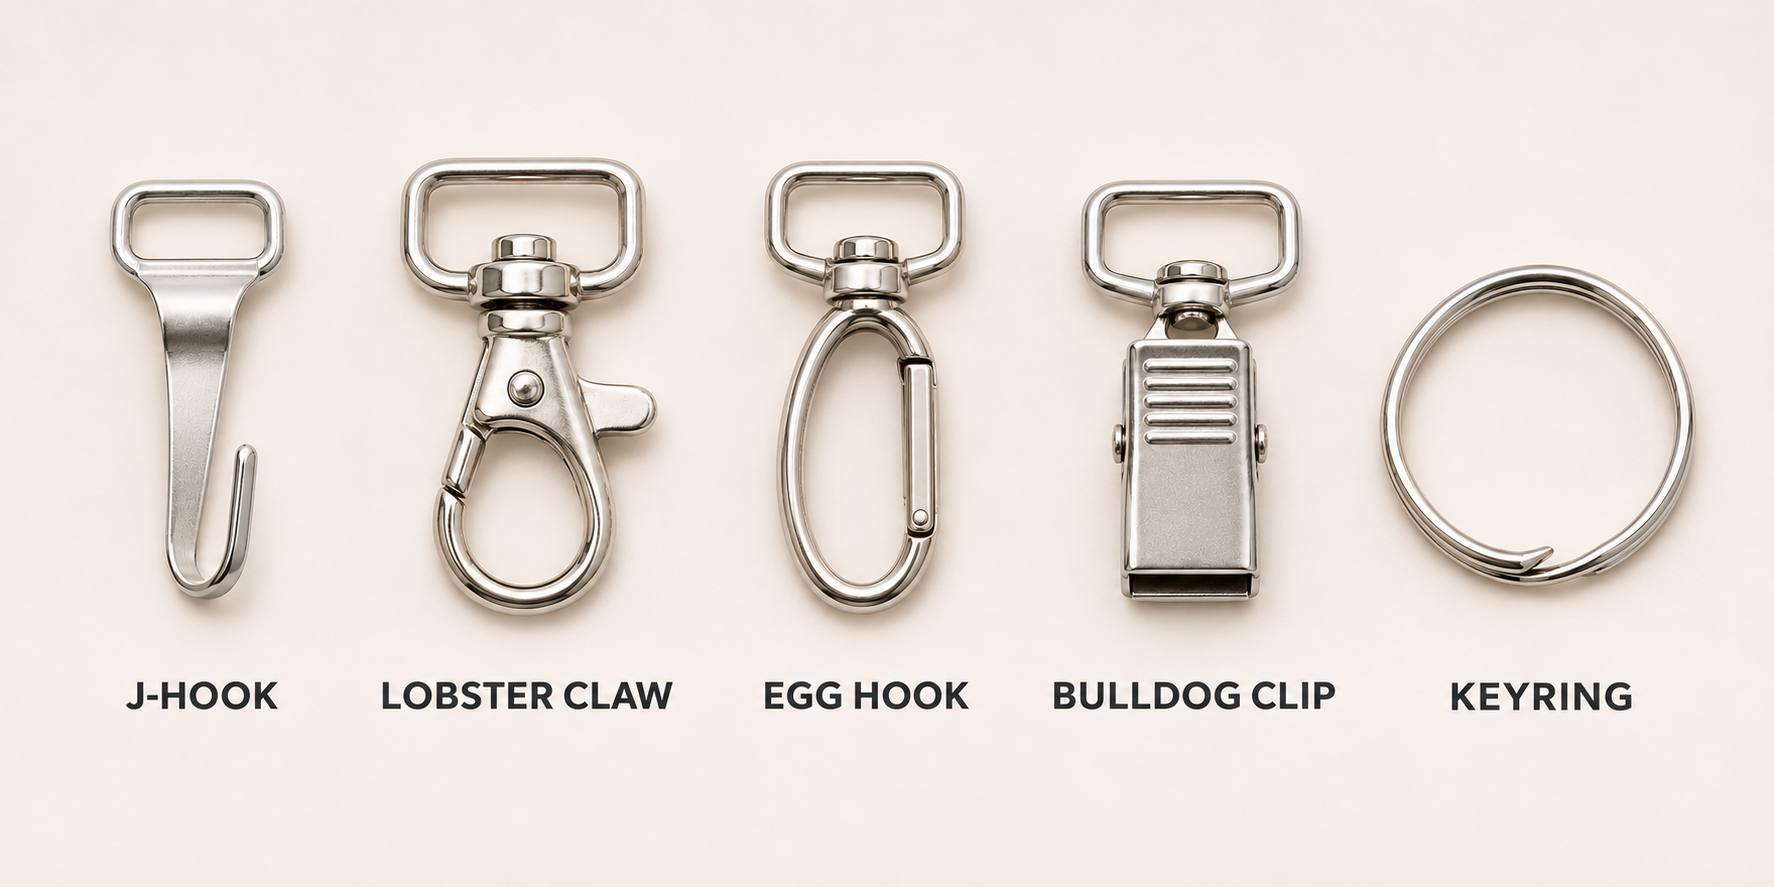
Hardware is not an afterthought; it is about function. The fanciest lanyard is useless if it cannot properly hold what it is supposed to. I always tell my clients to think about the end-user first. What will they be attaching to this lanyard? Is it a single key, an ID card, or a full event credential in a plastic holder? The answer determines the attachment you need. The most common mistake is not matching the clip to the badge. A J-Hook can be awkward with a wide-slotted badge, while a Bulldog Clip is perfect for it.
Core Hardware Decisions
You need to make two decisions here: the clip and any extra features.
-
The Main Clip: This is where the badge or key attaches.
- J-Hook: The standard, all-purpose choice. Great for keys or badges with a simple round hole.
- Lobster Claw: A more premium-looking version of the J-Hook.
- Bulldog Clip: The best choice for attaching to the top of a slotted ID card. It keeps the badge facing forward.
- Keyring: A simple split ring, ideal for holding keys or small accessories.
-
The Safety Breakaway: This is a plastic clip, usually placed at the back of the neck, that automatically releases under pressure. It is an essential safety feature for anyone working in schools, hospitals, or industrial environments where a lanyard could get caught. For a standard corporate conference, it might be optional, but I strongly recommend it as a default. It adds very little cost and provides significant peace of mind.
Conclusion
To order lanyards perfectly, specify your material, width, print method, hardware, and safety breakaway. This simple checklist will make you a pro and ensure your supplier delivers exactly what you need.